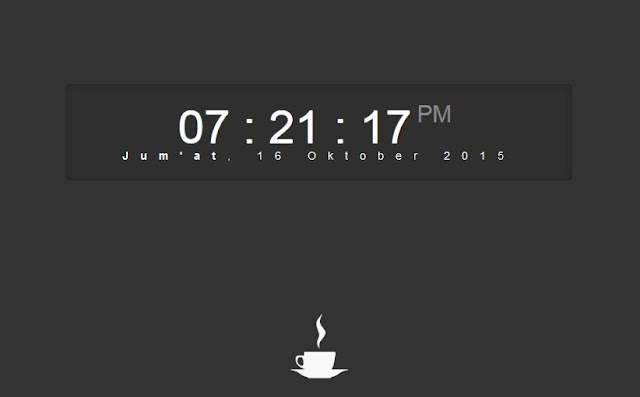
How To Add a Loading Page Effect with a Digital Clock as The Background. Yesterday in my previous article i've shared a tutorial on how to install the loading page effect, also in this article i will share a similar tutorial, but differ in terms of zoom. Yes a loading page effect combined with a large digital clock size as the background.
I am sure this will enhance the look of your blog when a visitor clicks on a link of your blog page, this effect will appear and will stop or hidden by itself automatically, or when the visitors move from one page to another pages, and as usual to add this widget then you must follow the installation process below.
I am sure this will enhance the look of your blog when a visitor clicks on a link of your blog page, this effect will appear and will stop or hidden by itself automatically, or when the visitors move from one page to another pages, and as usual to add this widget then you must follow the installation process below.
 |
| Loading Page Effect with a Digital Clock as The Background |
Let's start to add a Loading Page Effect with a Digital Clock as The Background :
Step 1: Login to your blogger panel adminStep 2: Click On Template » Edit HTML
Step 3: Add this css code just before the code </head>
<style>
#loadingPage {
background:url(https://blogger.googleusercontent.com/img/b/R29vZ2xl/AVvXsEiqXvljzrU6rjE8Emf_m43aHCHdvYkSi3fnnI3cgp-mY0vpSK7J3FQ85NrTkLOsqOp_GSb7tpa8fCTxBNre9Oc8BLVlm0OKPtzwMqYTeM1ftAFzJ5CQ_4VpLcipcAgwR06c6aJwnUUbsCM/s1600/dark-loading.gif) no-repeat center;
background-color:rgba(0, 0, 0, 0.32);
width:100%;height:100%;
position: fixed; left: 0px; top:0px; z-index: +100000;
}
#digital-clock { position:fixed!important;top:0px;left:0px;width:100%;height:100%;background:#333 url(https://blogger.googleusercontent.com/img/b/R29vZ2xl/AVvXsEhq86FzvcBBa3mzJvT0LdDrbO_5WDQun5ov7TUIv4w0Tc53yA5coR8nIDvuK_onNBy1vGvqM9Cde-T-vJNF7WV2EkG2S9sGoGx97_-sIrHTxpCyrwVVWI4Jz4bS9hSE-XL8tWMzlFts4qs/s1600/ajaxloader.gif) no-repeat center 85%; z-index:+100000; cursor:default; display:none; } .wrapper-clockdate { padding:25px; max-width:600px; width:100%; text-align:center; -webkit-border-radius:3px; border-radius:3px; margin:0 auto; margin-top:15%; -webkit-box-shadow:inset 0px 0px 10px #222; box-shadow:inset 0px 0px 10px #222; -webkit-border-radius:5px; border-radius:5px; background-color:#2f2f2f; } #clock-large { font-family:Orbitron, sans-serif; font-size:60px; text-shadow:0px 0px 1px #fff; color:#fff; } #clock-large span { color:#888; text-shadow:0px 0px 1px #333;font-size:30px;position:relative;top:-27px;left:-10px; } #date-large { letter-spacing:15px; font-size:14px; font-family:arial,sans-serif; color:#fff; }
</style>
Step 4: Find this code <body> using Ctrl+F then add the following code after the code <body>
<div id='loadingPage' style='display:none!important;'></div> Step 5: Add the following jQuery code just above the code </body>
<script type='text/javascript'>
//<![CDATA[
$(document.body).append('<div id="digital-clock"><div class="wrapper-clockdate"><div id="clock-large"/><div id="date-large"/></div></div>');
$(window).on("beforeunload", function() {
$('#digital-clock').fadeIn(500).delay(8000).fadeOut(1000);
});
function showTime(){var a_p="";var today=new Date();var curr_hour=today.getHours();var curr_minute=today.getMinutes();var curr_second=today.getSeconds();if(curr_hour<12){a_p="<span>AM</span>"}else{a_p="<span>PM</span>"}if(curr_hour==0){curr_hour=12}if(curr_hour>12){curr_hour=curr_hour-12}curr_hour=checkTime(curr_hour);curr_minute=checkTime(curr_minute);curr_second=checkTime(curr_second);document.getElementById("clock-large").innerHTML=curr_hour+" : "+curr_minute+" : "+curr_second+" "+a_p}function checkTime(i){if(i<10){i="0"+i}return i}setInterval(showTime,500);
// Digital Clock
var months=["Januari","Februari","Maret","April","Mei","Juni","Juli","Agustus","September","Oktober","November","Desember"];var myDays=["Minggu","Senin","Selasa","Rabu","Kamis","Jum'at","Sabtu"];var date=new Date();var day=date.getDate();var month=date.getMonth();var thisDay=date.getDay(),thisDay=myDays[thisDay];var yy=date.getYear();var year=(yy<1000)?yy+1900:yy;document.getElementById("date-large").innerHTML="<b>"+thisDay+"</b>, "+day+" "+months[month]+" "+year;
//]]>
</script>
<script>
//<![CDATA[
//Loading Halaman
$(window).bind("load", function() {
$('#loadingPage').slideUp(1000);
});
$('#loadingPage').click(function(){
$('#loadingPage').fadeOut(1000);
});
//]]>
</script>Step 6: Last step Save the template, see the results and good luck.


0 Comments: